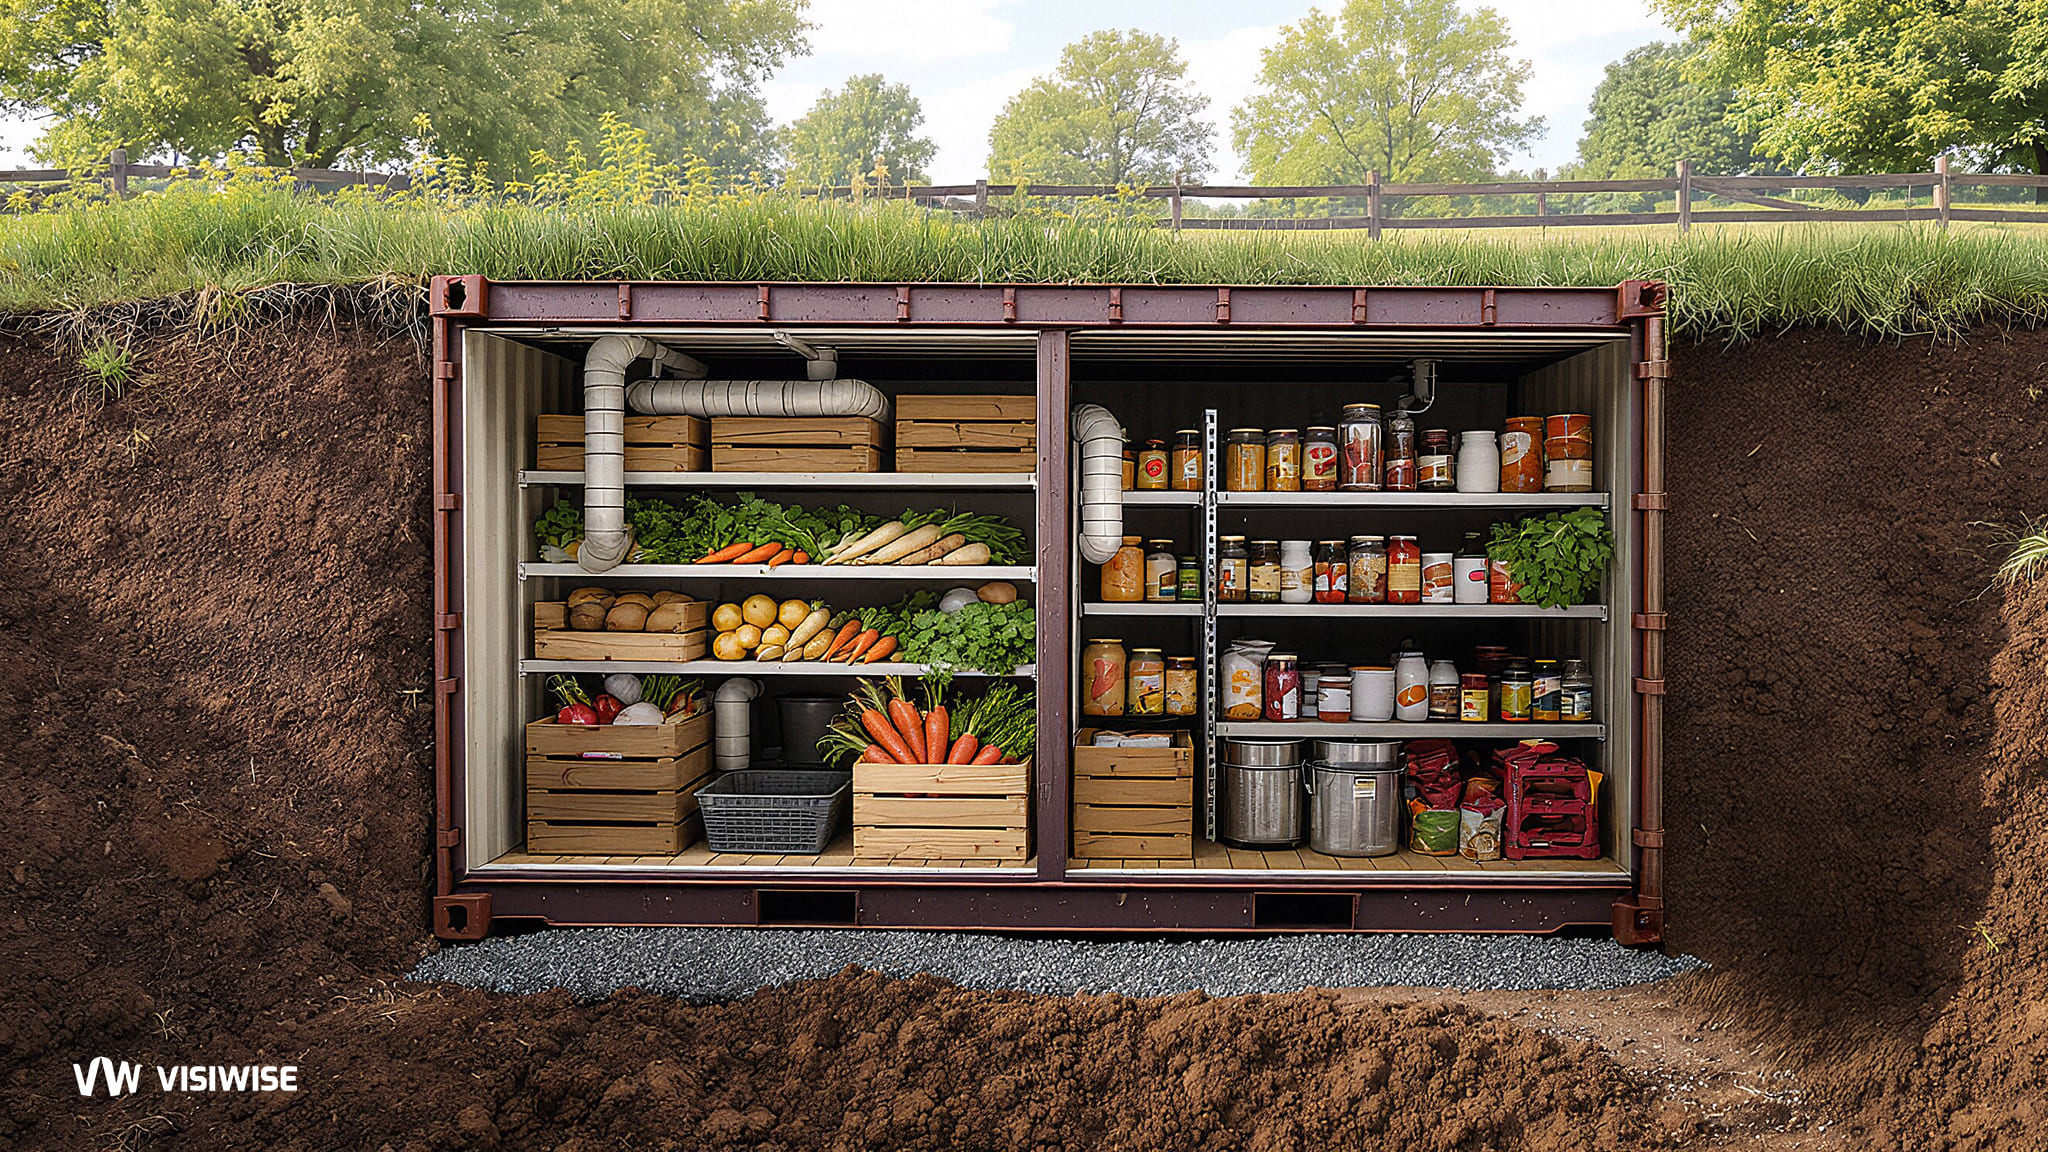
Shipping containers are a cost-effective and efficient option for building robust structures. While shipping container homes, offices, and portable storage units have become popular alternatives to traditional construction, people are also increasingly looking into buried container solutions for underground systems—especially for building a root cellar. However, buried shipping container construction differs significantly from its aboveground counterpart.
If you’re planning on building an underground bunker or a shipping container root cellar, read on below. We’re looking into how to bury shipping containers for underground applications.
Are Buried Shipping Containers Safe for Root Cellar Use?
A shipping container bunker should serve as a safe haven. You do not want your container to fail or the walls to collapse due to intense ground pressure. If you’re using an adequately reinforced shipping container, you’ve already eliminated most of the risks surrounding a structural failure.
Still, there are some additional factors that you should consider while using a shipping container root cellar underground to ensure adequate safety:
- Container walls may have an anti-rust or paint coating. Therefore, you must insulate the container walls to ensure that you do not inhale toxic fumes.
- Your container may have wooden flooring treated with chemicals. In such cases, you can replace the wood floor with marine plywood or install an additional layer of timber over the existing floor space.
Most safety issues generally arise from not buying the correct shipping container. If you purchase your container from a reliable supplier, you will most likely receive a structure that’s safe from these hazards.
Shipping containers with appropriate safety measures, reinforcement, and ventilation can be incredibly safe as underground bunkers or root cellars.
Reinforcing Your Container for Underground Use
A shipping container has a monocoque structure, which means the corner frames carry most of the load while the walls are comparatively weaker. When you bury a shipping container underground, the ground pressure from all sides can be intense. Some root cellar containers have about six feet of soil layer over them.
Even if the walls do not fail completely, cracks and dents can be detrimental to the structural integrity of your shipping container root cellar. Therefore, every underground container requires appropriate reinforcement to improve its strength.
So, how much strength does your container need? Think of a heavy truck or trailer moving along the surface above the ground. Below are some of the best ways to reinforce buried containers.
How to Bury a Shipping Container Root Cellar
If you bury a shipping container correctly, you can help prevent any setbacks from occurring later on. Remember, a root cellar that does not come in direct contact with neighboring soil will not cave in due to the pressure. Here are some steps you must follow while burying cargo containers for underground use:
- Digging a hole: You’ll need a pit that’s large enough to bury a shipping container root cellar and the support reinforcement. Leave about an additional four-foot space along each side.
- Burial depth: Depending on how much of the container you want to remain above the surface, you can determine an appropriate depth.
- Burying upside down: Planting a container upside down allows the thicker floors to act as the roof of your bunker or root cellar.
Popular Methods for Reinforcing Your Root Cellar
Gabion Cages
A gabion cage is a simple yet robust solution for adding reinforcements around your container walls. Build a steel cage in the space surrounding your underground root cellar and fill it with stones to create a barrier between the soil and the container.
Structural Steel Modifications
Modifying the container’s structure with additional support members is the most effective method of reinforcing root cellar containers. Weld strong steel bars or I-beams along the roof and periphery.
Rock/Sand-Filled Barrels
You can line up multiple barrels or use sandbags to create a wall around your buried container. While cheaper, they may not provide the strength needed for areas with significant overhead pressure.
Root Cellar Challenges and How to Overcome Them
In addition to structural concerns, shipping container root cellars face other underground challenges:
- Rapid rust from saline-rich soil.
- Cracks or dents compromising insulation and air circulation.
- Contaminated or humid air causing mold and health risks.
- Waste and greywater buildup leading to bacterial growth.
To overcome these:
- Choose containers free of toxic materials.
- Bury the unit where the strongest parts take the most pressure.
- Reinforce walls and avoid soil contact.
- Apply anti-rust coating.
- Design proper air filtration systems.
- Install composting toilets.
- Ensure an emergency exit and adequate supplies.
Practical Uses of a Buried Container Root Cellar
People bury containers for different reasons, especially for practical root cellar applications. A shipping container will typically last about fifteen years underground. Common uses include:
- Storage: Long-term food supplies, valuables, or household goods.
- Storm shelters: Shielding from rain, storms, and heat waves.
- Survival bunkers: Protection during civil unrest or conflict.
- EMP-proof shelters: If modified correctly with a Faraday cage, a buried container can shield from electromagnetic pulses.
Pros and Cons
Advantages
- Cost-effective, especially when buying used units.
- Modular and customizable.
- Easy delivery to your property.
Disadvantages
- Requires modification before burial.
- Ventilation, insulation, and structural reinforcement are essential and costly.
- Poor design can lead to collapse or hazardous conditions.
A properly reinforced and ventilated shipping container root cellar can be a lifesaving shelter or efficient storage unit—but an unmodified one can be dangerous.
13 Root Cellar Alternative Ideas
If building a full underground root cellar with a shipping container isn’t feasible, here are 13 low-cost or DIY-friendly alternatives to consider.
1. Trash Can Root Cellar
- Materials: metal trash can (with a lid), waterproof cover (like a tarp), straw, shovel
- Difficulty Level: Easy
- Description: Perfect for storing root vegetables, the Trash Can Root Cellar is simply dug into the earth, filled with your root veggies, covered with straw, and topped with both the tarp and the lid. Easy to upkeep and cheap to make!
2. Bucket Root Cellar
- Materials: 5-gallon bucket (with a lid), drill, shovel, straw (optional)
- Difficulty Level: Easy
- Description: Potatoes, onions, and root vegetables work well with this very simple and easy Bucket Root Cellar. Dig the bucket into the earth, add the lid, and for extra protection, feel free to top it with a bale of straw.
3. Bury an Old Freezer (or Refrigerator)
- Materials: old chest freezer/fridge, PVC pipe, tarp, shovel
- Difficulty Level: Somewhat Difficult
- Description: As long as you are simply recycling an old chest freezer, this option is still pretty cheap. It can be a bit tricky if your freezer still contains freon (see post for more details), however, besides the freon issue, it’s not too hard to bury an old freezer for holding your potatoes or root vegetables.
4. Pallet Root Cellar
- Materials: 6 pallets, tarp, shovel, assorted tools for cutting pallets
- Difficulty Level: Medium
- Description: If you can get your hands on some pallets, you can make a mini root cellar under the earth for your dried goods and root vegetables.
5. Make a Cold Storage Room in Your Basement
- Materials: vents, insulation, assorted wood, assorted tools
- Difficulty Level: Medium-Difficult
- Description: If you have the space in your basement for a cold storage room, this might be the best solution for you. It does take some careful research to understand how to circulate the air in your new cold storage room and how to manage the temperature and humidity levels.
6. Make a Zeer Pot
- Materials: 1 small clay pot with a lid, 1 large clay pot, sand, duct tape
- Difficulty Level: Easy
- Description: Zeer pots are pretty fascinating. They can keep your food cool due to water evaporation from the combo of a large clay pot, sand, and small clay pot. It’s easy to make and could be a fun way to teach science to your kids.
7. Build a Spring House
- Materials: small creek or stream on your property, assorted tools, assorted lumber
- Difficulty Level: Difficult
- Description: If you are fortunate to have fresh running water on your property, you might be able to make a spring house. These beautiful buildings are a very traditional way of storing your food. The cool water keeps the spring house at steady temperatures for food storage.
8. Make a Storage Clamp
- Materials: straw, shovel
- Difficulty Level: Easy
- Description: A Storage Clamp is a very old way of storing potatoes and root vegetables. It is incredibly easy: find some level ground, cover with straw, top with your vegetables, and then add more straw. Easy.
9. Using Your Garage/Outbuilding
- Materials: assorted tools, lumber, insulation
- Estimated Cost: Cheap-Average (depending on the condition of your garage/outbuilding)
- Difficulty Level: Easy-Medium
- Description: If you live somewhere with cold winters, you can often use your garage or outbuilding as a “seasonal cellar” for your root vegetables. Even if your garage/outbuilding is insulated, it’s not a bad idea to add another layer of insulation to keep the temperatures stable. Place your veggies in old coolers or cardboard boxes and put in a dark and cool place.
10. Use Your Attic
- Materials: assorted tools, lumber, insulation
- Difficulty Level: Easy-Medium
- Description: If you have an attic and you live somewhere with cold winters, you can often use your attic as a “seasonal cellar” for your produce. Just like with your garage/outbuilding, it’s always best to double up on the insulation for stable temperatures and keep your produce in cardboard boxes or old coolers.
11. Make a Food Storage Shelf
- Materials: assorted tools, lumber, etc.
- Difficulty Level: Medium
- Description: Even a spare bedroom or your pantry can hold fruits and vegetables for long storage, as long as the shelves keep your produce dark and cool. There are plenty of ways to make shelves for this, but here is my favorite DIY plans:
12. Store Vegetables in Cardboard Boxes
- Materials: cardboard boxes, straw/peat moss/sand/newspaper/filling
- Difficulty Level: Easy
- Description: If you have a cool place available (even under a bed!), you can simply use cardboard boxes and whatever filler you have available to store your root vegetables.
13. Store Root Vegetables in Sand
- Materials: sand, containers
- Difficulty Level: Easy
- Description: Use whatever boxes/old coolers/storage containers you have handy, and fill them with the fine sand you use in children’s sandboxes. This is one of the easiest and cheapest ways to store your produce.
Final Thoughts
Shipping containers are an excellent choice for all kinds of structures. But when you use one for a root cellar, it must be modified for underground conditions. With the right reinforcements, insulation, and systems for air and waste management, a buried container can serve as a highly effective and safe underground unit.
